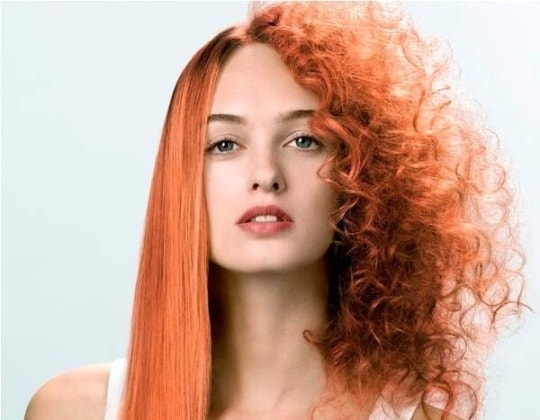
In this article, we are discussing some easy and simple steps to straighten curly hair. Sometimes, thick and curly hair is unmanageable and creates a mess. However, these days people use excess heat products to control this unmanageable mess. Thus, that leads to dry hair, hair fall, and hair damage. So the best way to use these straightening tools are to minimize the use of it. We have listed some simple and best steps to straighten curly hair at home.
Those who know how to straighten hair can do it easily, but those who are doing it for the first time, it can become a difficult task for you. However, it is easy to use hair straighteners on your own. Follow the steps given in this article to straighten curly hair.
How to Make Hair Ready for Straightening?
It is always important to know your hair type before you start the process. Always wash your hair before straightening your hair. The outside pollution, oily scalp, greases, and dirt can damage your hair. So wash your hair thoroughly before starting the process. A well-conditioned hair is easier to manage and reacts well to straightener.
Simple Ways to Straighten Curly Hair
1.) Invest in a Good Flat Iron
It is important to use a good flat iron to straighten curly hair properly. There are several types of flat iron available in the market. It is best to choose one with ceramic coating that protects your hair from heat and gives your hair a shiny texture. Another most important thing is to check the correct size of the hair straighteners. The best size is one to half inches wide. Also, check the weight of the iron, that shouldn’t be too heavy to use.
2.) Wash Your Hair
As mentioned above, it is important to wash your hair well before you start the straightening process. Make sure your hair is completely dry. Because straightening on wet hair can damage them completely and makes it frizzier. It is easier to straighten clean and tangled free hair. Also, use a good conditioner for a smooth process.
3.) Apply Heat Protector
Applying heat protector is important to protect your hair from excess heat. Apply this hair protector at the bottom of your hair strands. This will also protect your hair from frizz. Comb your hair well after applying heat protector.
4.) Section Your Hair
This is another important step is to section your hair. When you do it randomly it creates confusion and chaos. So it’s better to make sections, strands, and layers for easier straightening process. This will also help you focus on each part equally and evenly. Pin all the hair up on the top with bobby pins and clips.
5.) Pick the Right Heat Setting
Now, it’s time to heat your straightener. Different hair types need different heat setting to straight curly hair. First, try and practice once to check what suits you best. If you have thick and curly hair 300-350 degrees temperature is the recommended heat setting to straighten curly hair.
6.) Straight the Bottom Section First
It is best to straight bottom section first to make the rest straightening process smooth. Divide your hair into two sections and straight their bottoms.
7.) Straight Curly Hair
Now, start straightening your hair from the nape section then top following the temples. Take one section first and straight it leaving one-inch space from the roots. Repeat this process with all the sections. If you find any steam or sizzle stop the process right away.
8.) Hairspray (Optional)
Once you are done with the straightening process, many people use hairspray that keeps your hair fixed and frizz free for all day long. It also adds more shine and texture to your hair. You can also go for hair serums that are best for thick and curly hair giving you smooth and polished look. So now, you are ready to flaunt your straight curly hair.


